3D View
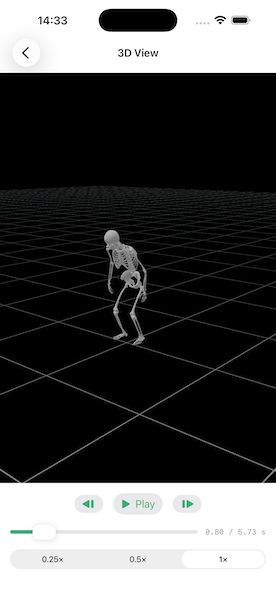
Render an activity's animation motion data as an interactive 3D view — the same skeletal
playback used in the Model Health web app, embeddable directly in your own app.
3D View is a Swift/TypeScript-only feature. The Python SDK can still fetch the underlying
animation motion data, but there's no bundled viewer for it.
Installation
- Swift
- TypeScript
If you've already added the Model Health Swift package (see Installation),
add the ModelHealthUI product alongside ModelHealth to your target — it's a separate
product so apps that don't need the 3D view don't pay for WebKit/SwiftUI.
npm install @modelhealth/viewer-react
Loading Animation Data
- Swift
- TypeScript
Swift loads the data automatically when you construct View3DController with an activity —
see Rendering the Viewer below.
import { fetchAnimationTransforms } from '@modelhealth/viewer-react';

const transforms = await fetchAnimationTransforms(client, activity);
fetchAnimationTransforms fetches and parses the activity's animation motion data in one call.
Rendering the Viewer
- Swift
- TypeScript
import SwiftUI
import ModelHealthUI

struct ActivityViewer: View {
    @StateObject private var controller: View3DController

    init(activity: Activity, client: ModelHealthClient) {
        _controller = StateObject(wrappedValue: View3DController(for: activity, using: client))
    }

    var body: some View {
        View3D(controller: controller)
    }
}
Constructing View3DController(for:using:) immediately fetches and loads the activity's
animation data — no separate load step. Check isLoadingTransforms to show a loading state,
and call reload() to retry after a lastError.
import { useRef } from 'react';
import { View3D } from '@modelhealth/viewer-react';
import type { View3DHandle } from '@modelhealth/viewer-react';
import '@modelhealth/viewer-react/styles.css';

function ActivityViewer({ transforms }) {
  const viewerRef = useRef<View3DHandle>(null);
  return <View3D ref={viewerRef} transforms={transforms} />;
}
Playback Controls
View3D renders no built-in playback UI on either platform — you drive playback yourself, so
you can style controls to match your app rather than a fixed embedded toolbar.
-
Swift —
View3DControllerexposesplay(),pause(),seek(to:),step(_:),setPlaybackSpeed(_:), plus publishedisReady/currentTime/duration/isPlayingyou can bind directly to SwiftUI controls (sliders, buttons). -
TypeScript —
View3D's ref exposes the same operations (play,pause,seek,step,setPlaybackSpeed) pluscurrentTime/duration/isPlaying/playbackSpeedgetters. The package also exports a ready-made<PlaybackControls>component if you don't want to build your own:import { PlaybackControls } from '@modelhealth/viewer-react';
<PlaybackControls
currentTime={viewerRef.current?.currentTime ?? 0}
duration={viewerRef.current?.duration ?? 0}
playing={playing}
playbackSpeed={playbackSpeed}
onTimeChange={(time) => viewerRef.current?.seek(time)}
onPlayingChange={(next) => (next ? viewerRef.current?.play() : viewerRef.current?.pause())}
onPlaybackSpeedChange={setPlaybackSpeed}
onStep={(direction) => viewerRef.current?.step(direction)}
/>
Following Another Clock
To put the model beside the recorded video, let the video's playhead drive it rather than
running two clocks side by side. While an external clock is on, playback never advances on
its own — play() does nothing, and seek is the only thing that moves the current time.
- Swift —
controller.setExternalClock(true) - TypeScript — the
externalClockprop on<View3D>
Then hand it the video's time as often as your own clock updates. Once per video frame is fine, and costs no more than calling it slowly:
- Swift
- TypeScript
controller.setExternalClock(true)

let step = CMTime(seconds: 1.0 / 60.0, preferredTimescale: 600)
player.addPeriodicTimeObserver(forInterval: step, queue: .main) { time in
    controller.seek(to: time.seconds)
}
<View3D ref={viewerRef} transforms={transforms} externalClock />

// every frame the browser paints
const tick = () => {
  viewerRef.current?.seek(videoRef.current.currentTime);
  requestAnimationFrame(tick);
};
Ground Reaction Force Overlays
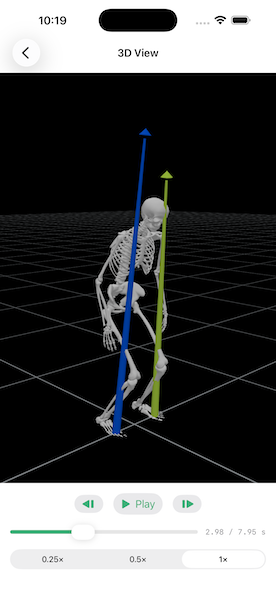
View3D can render ground reaction force (GRF) vector overlays on
top of the animation. This isn't backed by a dedicated SDK motion data type: you upload
your own externally measured GRF data — from a force plate, instrumented treadmill, or
similar — in whatever format you have it (CSV, JSON, plain text, etc), tagged with a name
of your choosing. The backend syncs it to the trial and produces a
.sto-formatted result tagged <tag>-sync. That synced .sto result is what actually
gets fetched and parsed for the overlay, regardless of the format you originally uploaded.
Syncing external GRF data to the trial requires support for your specific data format and
capture setup in our core algorithms. It is not enabled by default. Contact us
at support@modelhealth.io if you'd like to use overlays with your data — without
that support the upload will succeed but no -sync result is produced, and the overlay
stays empty.
The full flow:
- Initialize the client.
- Upload your GRF data via
addMotionData, tagged with a name of your choosing (e.g."my-grf"). - Set up the viewer with that same tag — it fetches the synced
.storesult automatically.
- Swift
- TypeScript
// 1. Initialize the client
let client = try ModelHealthClient(apiKey: "your-api-key-here")

// 2. Upload your GRF data, tagged with a name of your choosing — any format works
//    (CSV shown here); the backend syncs it and produces the .sto result the viewer reads
let grfData = try Data(contentsOf: grfFileURL)
let file = ExternalResultFile(tag: "my-grf", fileExtension: "csv", data: grfData)
let updatedActivity = try await client.addMotionData([file], to: activity)

// 3. Construct the controller with the updated activity and the same tag — it fetches the
//    synced .sto result (tagged "my-grf-sync") automatically, alongside the animation data
let controller = View3DController(for: updatedActivity, using: client, externalDataTag: "my-grf")
If you don't know the tag ahead of time (e.g. it was uploaded by a different part of your
system), look for a Result on the activity whose tag ends in -sync and whose file
extension is .sto, and strip the -sync suffix.
import { fetchExternalSto, parseExternalSto } from '@modelhealth/viewer-react';

// 1. Initialize the client
const client = new ModelHealthClient({ apiKey: "your-api-key-here" });
await client.init();

// 2. Upload your GRF data, tagged with a name of your choosing — any format works
//    (CSV shown here); the backend syncs it and produces the .sto result the viewer reads
const grfBytes: Uint8Array = await loadMyGrfFile();
const file = { tag: 'my-grf', extension: 'csv', data: grfBytes };
const updatedActivity = await client.addMotionDataToActivity(activity, [file]);

// 3. Fetch and parse the synced .sto result using the same tag
const sto = await fetchExternalSto(client, updatedActivity, 'my-grf');
const overlay = sto ? parseExternalSto(sto) : null;
Pass the result to View3D's overlay prop:
<View3D ref={viewerRef} transforms={transforms} overlay={overlay ?? undefined} />
Troubleshooting
- No animation data available — the activity hasn't finished processing yet. Wait for
.analysingor.readystatus (see Activity Recording) first. Surfaced vialastError(Swift) or a thrown error fromfetchAnimationTransforms(TypeScript). - Swift: viewer fails to load —
View3DController.lastErroralso surfaces WebView-level load failures (e.g. a malformed bundled resource). Check it ifisReadynever becomestrue. - Overlay not appearing — fetching the overlay fails silently rather than throwing if the
tagged file doesn't exist or hasn't been synced yet. Confirm the tag you passed matches what
the file was actually uploaded under, and that a
-syncresult exists for it. If no-syncresult ever appears, synchronization likely isn't enabled for your GRF data — contact support@modelhealth.io.
Next Steps
3D View picks up where Activity Recording leaves off — once an activity is
.analysing or .ready, its animation data is available to visualize; there's no need to wait for
analysis to complete.